• main
  • about
  • contact me
  • as seen on
  • giveaways

Pages

June 20, 2011

DIY Silhouette Art

It's been awhile since I posted. Sorry about that! The past few weeks have been filled with birthdays, friend's bachelorette parties, and friend's weddings. I can't write for long as I have another wedding this weekend (that I'm in), and I've volunteered my help and support, but I do have a little dining room project to update you on.

I knew that I wanted to make something unique and original for our dining room, but something inexpensive as well. I made up my mind pretty quickly that I wanted to incorporate some silhouette art on our dining room walls. 

We recently painted our walls "Nautical Navy" by Valspar. The color was a drastic change, but hubby and I both love it. We knew we wanted our new picture frames to really pop and I think we definitely got the impact that we were going for. 

Okay, here are the deets...

Supplies:
  • Pictures to use for silhouettes
  • Plain white paper
  • Black paper
  • Oval picture frames
  • Rustoleum spray primer
  • Rustoleum Ultra Cover spray paint (we chose sun yellow in the gloss finish)
First, you will want to take a picture of each person (or pet) from the side, print the picture, and you will cut the silhouette out from the rest of the background of the picture. Be sure to be as precise as possible, getting all of the little details of the silhouette. I didn't take a picture of this step but it's pretty self-explanatory.

Second, you'll place the cut out silhouette on your piece of black paper. 


You will then trace around the picture silhouette...


Next, you will cut the silhouette out!


 Repeat this step for all of the silhouettes.


Next, you'll want to trace the paper from the frame around the white sheet of paper you will be using to create your art. It'll look a little something like this...


Then you'll cut out your new oval shape...


And to complete the silhouette art, you'll paste the silhouettes to the plan white paper.


The frames were originally black but I gave them several light coats of the Rustoleum primer and then several coats of the spray paint. This is actually the first time that I used Rustoleum paint, as I'm normally a Krylon gal myself. I chose to go with Rustoleum because I loved their yellow color, but I really loved the Rustoleum brand and I think I might've found my new favorite spray paint.

Anyways, enough babbling, here is the finished product!
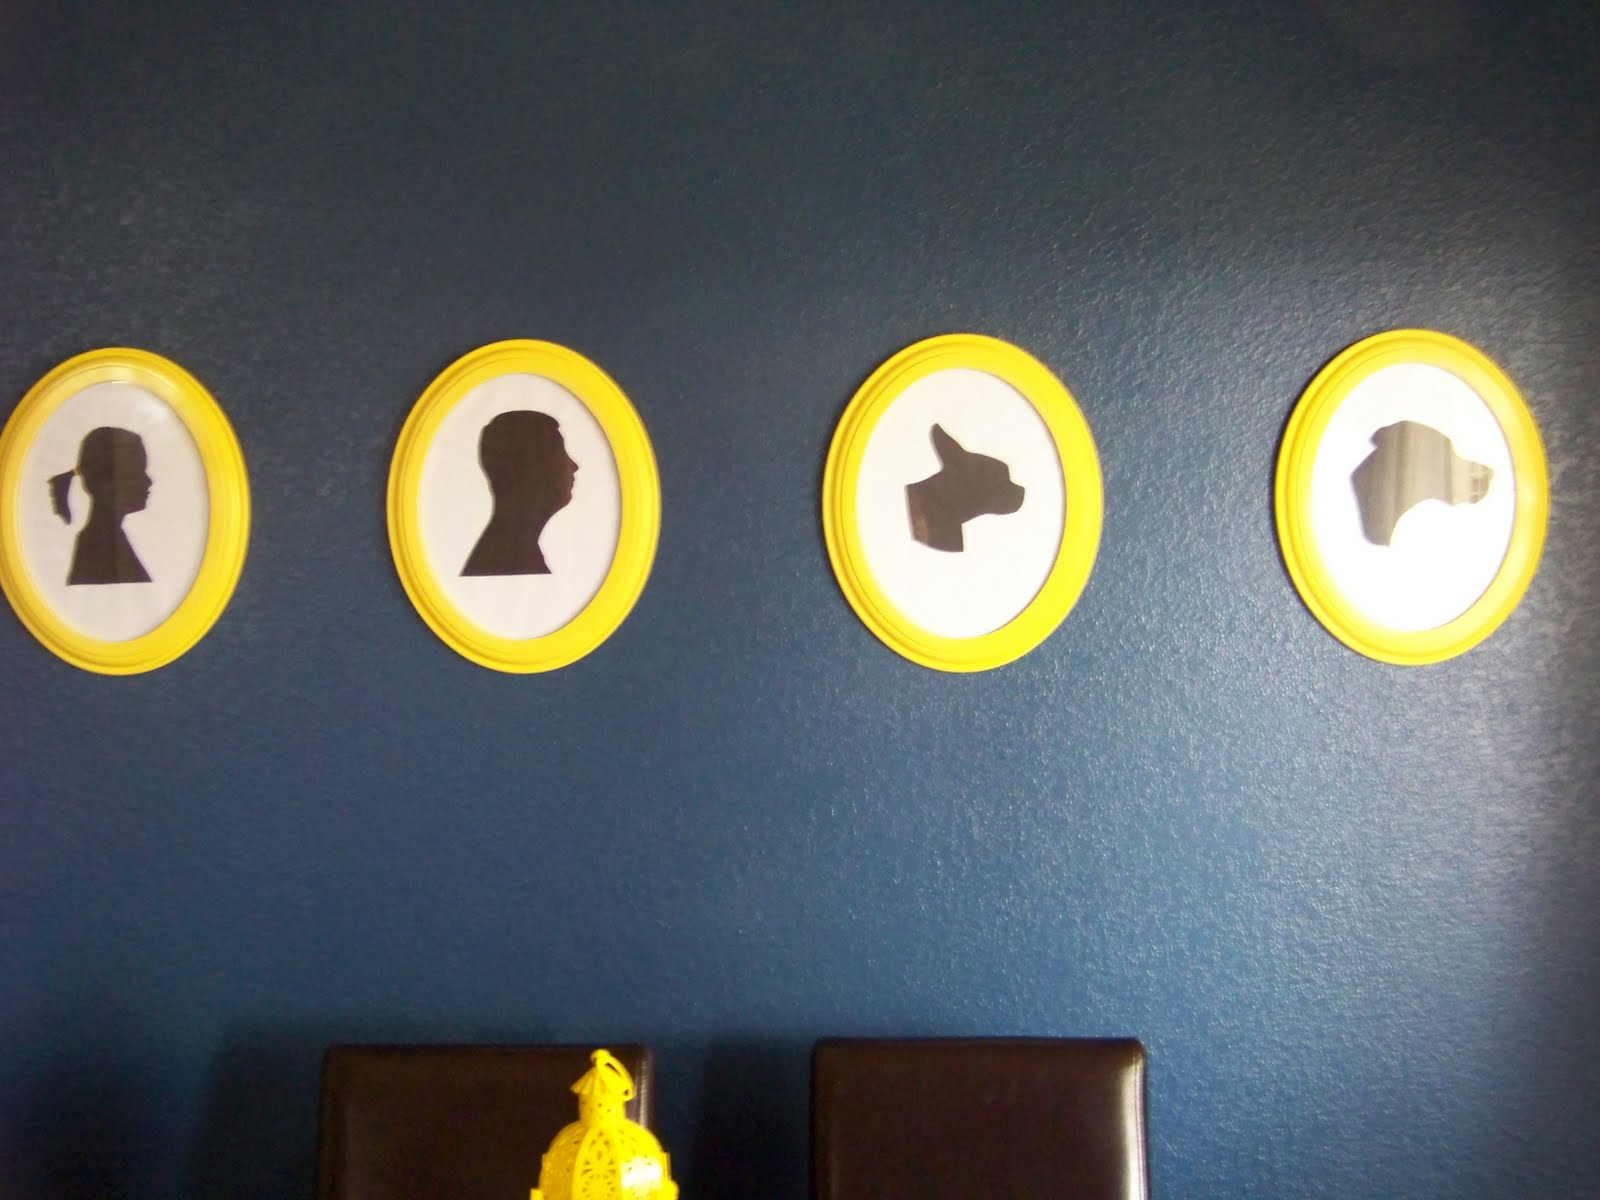
 Me
 Cody, the hubby
 Molly, our Great Dane
 Moose, our Boston Terrier

And the full view again...


I'm loving it! It was affordable, fun, and easy.


Do you have any silhouette art in your home? x

June 7, 2011

A BIG Announcement

I cannot believe that I haven't shared this news with you sooner, the days are seriously going by so quickly! It was just twenty-seven days ago that I posted about how grim the teaching job market is looking (you can read that post here), but today I can announce that just sixteen days after I wrote that post a school district about 20 minutes from my home offered me a position teaching 7th grade English-Language Arts. So crazy, right?

I don't talk about my faith often on this blog, and you are more than welcome to skip this portion and scroll down to the cute pictures if you wish, but I do not feel as if I can write about my job offer without mentioning my true feelings about it. In a time where our economy seems to be crumbling, I believe that it truly was an act of God for me to find a teaching job. It breaks my heart that there are so many committed teachers out there who still haven't found a place to work, but it makes me smile to know that the Lord has given me a place to teach. My husband and I believe that God gave me this job because he has a specific purpose for me in this middle school, and I cannot wait to see what he has planned for me.

Now that I've found a job I'm, of course, super excited about decorating my classroom. In fact, I have an entire board on Pinterest dedicated to classroom ideas...here are some of my favorite classroom things.


  "Star Student of The Week" Chair. This will be so easy with a cheap buy from Craigslist.


So fun, right? I cannot wait to get started! x


Psst -- This opinion coming from a teacher...all of these things would be fantastic teacher appreciation gifts!

June 6, 2011

Stencil Me!

Sorry that my posts and my commenting on your posts have been so sporadic lately. It's been a busy few days here with family's high school graduations and wedding showers. Tomorrow I have a big announcement that also might do a little more explaining of where I've been lately. So, stay tuned and have a fantastic Monday!

I'm leaving you with one of my favorite things that I found recently on Pinterest...


Stencils are so hot right now, so why not use an oversized stencil on your floor? I think this would be just perfect in a beautiful sunroom!

June 2, 2011

My Favorite Pop!

I used to like to play it safe with neutrals and "classic" pieces, but more and more lately I've found myself loving bold pieces and bright pops of color. A favorite "pop" that I've been seeing around lately is lime green.Tell me that you don't love these rooms as much as I do!

 Images via apartment therapy, decor8, a la mode, and decorpad.

Do tell...do you love it too? x

June 1, 2011

Painting Woes

Quite some time ago I showed you a garbage find of mine. The piece wasn't perfect but I had big plans for it. Here's the little cart I found on the curb in our neighborhood...


But my most favorite feature were these rusty (but still so cool) metal casters...


My plan was to keep this cart in our bedroom and give it a coat of paint. The plans are still the same, but I'm having a little difficulty in deciding how to go about painting it. Let me explain, I've decided that there are two types of people out there when it comes to painting furniture:  

The first type of people are those who go about painting furniture the "hard" way...meaning they've sanded (and sanded and sanded), primed, and painted in order to makeover the piece of furniture. Michaela of Michaela Noelle recently made over a piece of furniture this way, and it turned out fabulously...


And then there are the other type of people who take the easier way out. I mean no offense by this statement because I am totally one of those people. If there's an easier way to get it done, I will most definitely do it that way. The easier way out would mean that you eliminate the most dreadful, tedious step...sanding. Instead of sanding, you simply make sure that the piece of furniture is extremely clean before you begin priming. Mandi from Vintage Revivals recently redid a piece of furniture this way and it turned out beautifully as well...


I'm just torn. I know that sanding will be a lot of work but I know that it's foolproof and always works. However, there are many people out there who taken gone the "easy way out" and haven't had an issue with any of their furniture. So what do you think...


Should I just get to sanding OR have you taken the easy way out and been majorly successful?? 

Please leave me a comment and let me know! x

Related Posts with Thumbnails